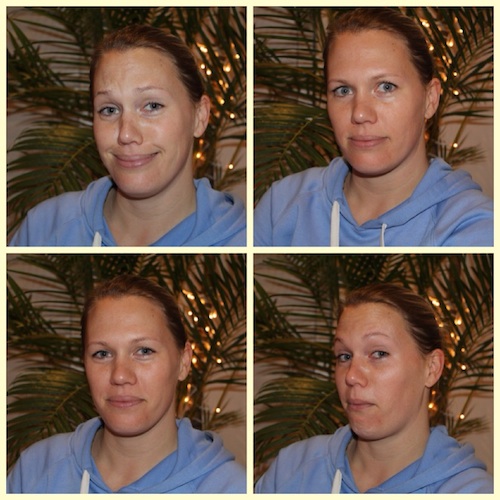
Jules is getting married in less than a month, and given that I (a brideslave) have been given the honour of doing her make-up on the big day, we thought we better get cracking and do a few test runs. As she is getting married in Greece, I need to make sure that the products I use are going to hold up in the heat – I don’t want her face to be slipping down her dress half-way through the ceremony! I have chosen a variety of primers and products with long-wearing formulations to ensure that she stays looking fresh and flawless from start to finish. Here is a step-by-step guide of what I did…

I started by applying some of my Smashbox Photo Finish Color Correcting Primer all over Jules’ face to create the perfect, smooth base for the foundation. I then buffed in two layers of Estée Lauder Double Wear Light Stay in Place Make-Up, followed by a light dusting of the Estée Lauder Lucidity Translucent Pressed Powder. For under the eyes I used the Bobbi Brown Corrector and Tinted Eye Brightener, and on the cheeks I used the cult classic, NARS Blush in Orgasm. I also used a little bit of my NARS Bronzing Powder in Laguna to gently contour Jules’ face.


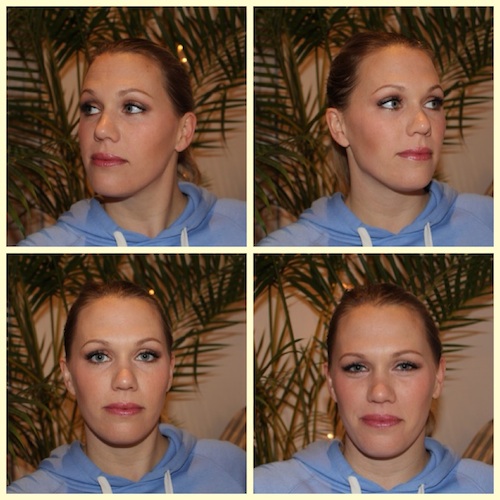
For the brows I used Jules’ favourite brow pencil, Anastasia Beverly Hills Brow Wiz, to fill in and elongate her brows. I then applied some Urban Decay Eyeshadow Primer Potion all over her lids to make sure that her eyeshadow stays put. I then used MAC eyeshadow in Brule (warm vanilla) all over the lid, right up to the brow bone, to create a uniform wash of colour. Next I took MAC eyeshadow in Patina (taupe with a gold shimmer) and packed it onto the lower half of the lid, from the lash-line to the crease. I then applied MAC eyeshadow in Woodwinked (warm antique gold) all over the lower half of the lid, and blended it out ever so slightly. I then took a little bit of MAC eyeshadow in Satin Taupe (taupe with a silver shimmer) and applied it to the outer corners and blended it out to create more of a smokey effect. I also ran a combination of Patina, Woodwinked and Satin Taupe along the lower lash-line. On the top waterline I used my Bobbi Brown Long-Wear Gel Eyeliner in Sepia Ink, and on the bottom waterline I chose MAC Eye Kohl in Powersurge (gold) – both of these colours are very subtle and create a really beautiful effect.

To line the lashes I used the darkest colour from my Stila ‘In The Light’ Palette, Ebony, and pushed it along the top lashline using a small angled brush. I then smudged it out a bit and applied some Stila Eye Pencil in Damsel to the outer corners to create more depth. Lastly I delved into Jules’ Urban Decay Naked 2 Palette and mixed together a combination of Busted (deep shimmery brown) and Tease (pale brown) and packed them onto the outer corners to create an even smokier effect.


On the top lashes I used Clinique Extreme Volume High Impact Mascara, and on the bottom I used Clinique Bottom Lash Mascara. I then applied some Ardell Duralash Flare Short Black Individual lashes using some Duo Eyelash Adhesive (available from Inglot) to create fuller, more fluttery lashes. On the lips we eventually settled on Chanel Rouge Coco Shine in Boy, followed by a slick of Chanel Glossimer in Wild Rose on top.


Et voilà – behold, the beautiful bride-to-be…

